As an Amazon Associate, we earn from qualifying purchases. Some links on this site are affiliate links at no extra cost to you. Our recommendations are based on thorough research and editorial judgment.

Workshop Layout Principles for Efficient Workflow
Have you ever felt overwhelmed in a cluttered workshop? Figuring out how to set everything up can be a real challenge, but getting your layout right can make all the difference in how you work. Keeping tools within a three-foot reach from your workstations can save you from those frustrating trips back and forth. Plus, it really helps with safety — you want to work efficiently, but you also want to avoid accidents.
One straightforward way to open up your space is to use vertical storage. Think about adding pegboards where you can hang tools. Not only does this free up floor space, but it also means your tools are easy to grab when you need them. You won’t believe how much easier it makes accessing everything.
And let’s talk air quality. Did you know maintaining a solid dust collection system with at least 550 CFM can impact your health and comfort while you work? Nobody wants to breathe in dust while trying to get things done, right? Having a system in place keeps the air clean and makes the workshop a more pleasant space to be in.
You might be wondering how these pointers tie into your overall productivity. Well, it’s all about creating an environment where you can focus. When everything’s organized and within reach, it’s easier to concentrate on the task at hand and get things done.
In short, an efficient workshop layout isn’t just about aesthetics; it’s about creating a functional workspace that boosts your productivity. What small changes can you make today to start improving your layout?
Key Takeaways
- Identify the main focus of the workshop to tailor the layout for specific projects and enhance productivity.
- Implement distinct work zones for cutting, assembling, and finishing to streamline workflow and improve safety.
- Maintain at least 3 feet of distance between workstations to foster efficiency and minimize accidents.
- Utilize vertical storage solutions and mobile workstations to optimize space and enhance tool accessibility.
- Regularly evaluate and adjust the layout based on project needs to maintain an efficient and organized workspace.
Understanding the Importance of Workshop Layout for Efficiency

Have you ever walked into a workshop and felt overwhelmed by the clutter? It’s a common issue that many of us face. Organization is really key when it comes to maximizing your efficiency. A smart layout can make all the difference in your daily routine.
Let’s talk about tool placement. Grouping similar tools together—like milling equipment and hand tools—saves you precious time. Instead of wasting minutes searching for that one drill bit, you can grab what you need and get right back to work.
Don’t forget the importance of creating distinct work zones. Setting up areas for cutting, assembling, and finishing can streamline your process and keep your workspace safe. Think about how that could cut down on unnecessary trips across the shop!
And while you’re at it, look into vertical storage solutions. Wall-mounted shelves or pegboards can keep your tools organized and off the floor. It not only opens up your workshop but also gives you easier access to what you use most. Got a quarterly project? Evaluate how well your layout is working and make adjustments as needed.
In the end, a thoughtful workshop layout isn’t just about aesthetics; it genuinely boosts your performance and productivity. So, what’s your current layout like, and how can you tweak it for even better results?
Also, integrating an efficient dust collection system into your workshop layout can significantly reduce cleanup time and improve air quality, enhancing overall workflow.
Defining Your Workshop Goals

How do you decide what your workshop needs to achieve? It all starts with knowing your workshop’s main focus—whether that’s woodworking, metalworking, or automotive repair. You’ll want to set some clear goals, like boosting your productivity or making the most of your space. By doing this, you can design your workshop to match what you want to accomplish.
Think about the types of projects you’ll dive into. This will help you figure out what tools you’ll need and how to best organize everything. The way you set up your tools and storage can make a world of difference when you’re in the thick of a project. And as you’re planning, consider your workflow. A thoughtful layout can smooth out the process, saving you from a lot of back-and-forth running around.
Don’t forget to regularly check in on your goals. New projects might come with new tools, and adjusting your layout can keep things running efficiently. If something doesn’t feel right, tweak it! After all, the ultimate aim is to make your workshop not just efficient, but also safe for whatever creative adventure you’re on. Incorporating a dust collection system is essential to maintain a clean and healthy workspace.
Prioritizing Safety in Your Workshop Design

Have you ever walked into a workshop and felt something was off? Maybe it was too cramped, poorly lit, or just not welcoming. Prioritizing safety in workshop design is critical for creating a space where you can actually get stuff done without worrying about accidents.
Start by thinking about ventilation. Proper air quality can be a game-changer—nobody wants to inhale harmful dust all day. And don’t underestimate the power of good lighting. Task lighting and LED strips can brighten up your workspace, making it easier to see what you’re doing and helping to keep accidents at bay.
Now, safety equipment is key, too. Make sure you’ve got fire extinguishers and first aid kits within easy reach. It’s also wise to invest in ergonomic features like adjustable workbenches, which can help prevent injuries when you’re working long hours. You don’t want to be bending down all the time or struggling to reach that high shelf!
Clear pathways are a must. You want to ensure that you can get to your safety gear quickly. Those emergency exits? Keep them unobstructed—you never know when you might need to make a quick exit. Regularly cleaning up and designating storage spots will help keep everything neat and tidy. When you’ve got a clutter-free workspace, you’re not just enhancing safety; you’re also improving workflow.
Equipping your workshop with proper respiratory protection can significantly reduce the risks associated with airborne contaminants, especially when working with dust or harmful fumes.
Incorporating these elements isn’t just about being smart; it’s about creating a workshop where you and everyone else can feel safe. So ask yourself: How can you make your space safer today?
Strategic Layout Planning: Creating Functional Zones
Are you constantly tripping over tools or searching for materials while working in your workshop? If so, it might be time to rethink how you’ve organized your space. Creating functional zones is not just a luxury; it’s a must for keeping things running smoothly and efficiently.
Consider having dedicated areas for cutting, assembling, and finishing your projects. By planning these spaces thoughtfully, you’ll cut down on the back-and-forth that can slow you down. Make sure there’s at least 3 feet between your workstations. This extra space helps you move around easily, avoiding any trips or falls. It’s frustrating to be in the zone and then have to navigate around clutter, right?
Here’s the trick: keep your hand tools organized and make sure materials are easy to grab in each section. You’ll notice that when everything is within reach, you won’t waste time looking for stuff. Plus, sticking to a logical flow from cutting to assembly helps minimize chaos and accidents.
So, why does this matter? Regularly checking in on these functional zones as your project needs change can really transform your workshop layout. You’ll find that your workflow improves, making every task less stressful. Incorporating a workbench with an integrated pegboard system can significantly enhance tool organization and accessibility in each functional zone.
Recommended Products

Specification: Garage storage system includes corner wall cabinet x 1, corner base cabinet x 1, wall cabinet x 2; 1-drawer cabinet x 2; 4-drawer cabinet x 1; workbench x 3, pegboard x 4. Item Weight: 302 lbs; Package Size: 55.1 x 36.2 x 75.6 in; Item Size: See Pictures; Item Color: Black and Grey The size of garage storage cabinet set are 130"L x19"Dx 76"H inches. Garage storage cabinets system includes Locker x2, Wall cabinet x2, 1-drawer roller cabinet x2, 4-drawer roller cabinet x1, 71 in workbench x1, Pegboard x10, Shelf to connect the wall cabinets x4.For stability, high cabinets can optionally be fixed to the wall. Overall weight capability 820 LBS.

Specification: Garage storage system includes corner wall cabinet x 1, corner base cabinet x 1, wall cabinet x 2; 1-drawer cabinet x 2; 4-drawer cabinet x 1; workbench x 3, pegboard x 4. Item Weight: 302 lbs; Package Size: 55.1 x 36.2 x 75.6 in; Item Size: See Pictures; Item Color: Black and Red. The size of garage storage cabinet set are 130"L x19"Dx 76"H inches. Garage storage cabinets system includes Locker x2, Wall cabinet x2, 1-drawer roller cabinet x2, 4-drawer roller cabinet x1, 71 in workbench x1, Pegboard x10, Shelf to connect the wall cabinets x4.For stability, high cabinets can optionally be fixed to the wall. Overall weight capability 820 LBS.

Reinforced Structure: Built to last, the system features heavy-duty metal cabinets made from 100% cold-rolled steel for superior strength and durability, complemented by secure furniture locks
Essential Tools and Equipment for an Organized Workspace
Is your workspace a hot mess, making it hard to focus on your projects? Trust me, you’re not alone. An organized workspace is crucial for being productive and keeping safe in any workshop. Let’s break it down.
First off, it’s important to have the right tools at your fingertips. Think about essential equipment like table saws, miter saws, drill presses, and routers. Each of these plays a key role in different woodworking tasks. You can’t complete a project without them.
Now, here’s the trick: consider mobile workstations on wheels. They’re a fantastic way to get some flexibility in your layout. You can move things around based on what you’re working on, making it easier to grab the tools you need right when you need them.
So, what about storage? Vertical storage options like pegboards and wall-mounted racks are perfect for keeping your most-used tools close by. This setup not only saves space but also streamlines your workflow, allowing you to focus on creating rather than searching for stuff.
Frankly, lighting can’t be overlooked either. Good lighting, plus having easy access to electrical outlets, can make a big difference in how well your workspace functions. You want to be able to see what you’re doing without straining your eyes and have your tools charged and ready to go.
Lastly, don’t forget about regular maintenance of your tools. Keeping them in good shape lowers risks and promotes a safer work environment. You want to work efficiently, and that means making sure your equipment is ready when you are.
Additionally, choosing a workbench with integrated power outlets can enhance productivity by keeping your tools powered and easily accessible.
To wrap it up, an organized workspace makes a world of difference in productivity and safety. So, take a moment to evaluate your setup—what’s one change you can make today to improve your space?
Recommended Products

Specification: Garage storage system includes corner wall cabinet x 1, corner base cabinet x 1, wall cabinet x 2; 1-drawer cabinet x 2; 4-drawer cabinet x 1; workbench x 3, pegboard x 4. Item Weight: 302 lbs; Package Size: 55.1 x 36.2 x 75.6 in; Item Size: See Pictures; Item Color: Black and Grey The size of garage storage cabinet set are 130"L x19"Dx 76"H inches. Garage storage cabinets system includes Locker x2, Wall cabinet x2, 1-drawer roller cabinet x2, 4-drawer roller cabinet x1, 71 in workbench x1, Pegboard x10, Shelf to connect the wall cabinets x4.For stability, high cabinets can optionally be fixed to the wall. Overall weight capability 820 LBS.


Utilizing Vertical and Horizontal Storage for Maximum Efficiency
Feeling overwhelmed by clutter in your workshop? You’re not alone. Many DIYers and hobbyists face this problem, but there are ways to tackle it head-on. By mixing vertical and horizontal storage options effectively, you can keep your tools organized and your workspace efficient.
Vertical storage solutions, like wall-mounted racks and pegboards, are lifesavers when it comes to saving floor space. They make it easy to grab the tools you need quickly, which can streamline your workflow significantly. Ever tried hanging up tools on a pegboard? It not only keeps everything accessible but also gives you a clear view of what you have.
On the flip side, horizontal storage options like tool chests and cabinets are key to keeping things neat. When everything has its own place, you can say goodbye to the chaos that eats away at your workspace. Plus, having a tidy workspace means fewer accidents and more safety while you work.
The flexibility of a French cleat system can also be a great addition to your storage lineup. You can hang various tools without consuming floor space, and rearranging is a breeze whenever your needs change. Isn’t it nice to have solutions that adapt to you?
Don’t forget about overhead storage, either. That space above your head is often ignored but can be fantastic for storing larger items like lumber or seasonal tools. By utilizing it, you can keep your immediate work area clear, giving you a more pleasant place to craft your projects.
In the end, organized storage isn’t just about neatness—it’s about creating a safe and functional workshop. Enhancing your storage strategy with high-lumen lighting can further improve workflow by illuminating your workspace effectively. So, what storage solution will you try first?
Recommended Products

-Versatile Configuration- Our Garage storage cabinet system includes movable tool cabinets, wall cabinets, and tall cabinets that can be freely combined to match your specific storage needs, ensuring optimal use of your garage space.
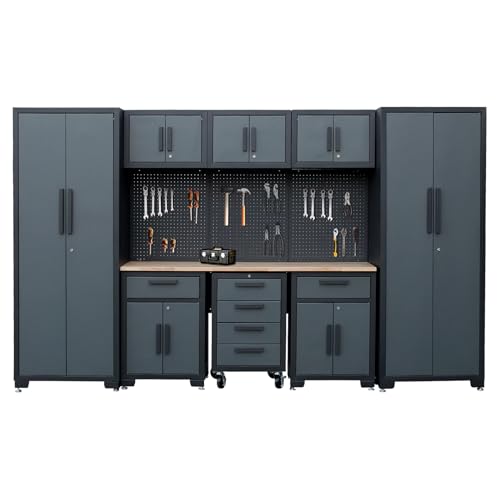
Dimensions & Constitute: The size of garage storage cabinet set are 130"L x19"Dx 76"H inches. Garage storage cabinets system includes Locker x2, Wall cabinet x2, 1-drawer roller cabinet x2, 4-drawer roller cabinet x1, 71 in workbench x1, Pegboard x10, Shelf to connect the wall cabinets x4.For stability, high cabinets can optionally be fixed to the wall. Overall weight capability 820 LBS.

QUALITY & PRACTICAL TEMPORARY WORK BENCH: Not only does this cabinet of ours improve storage capacity at different heights, but it also comes with 1.4-inch-thick rubberwood planks on which you can perform a variety of tasks, as well as provide you with a temporary tool storage area for added convenience and efficiency.
Managing Electrical and Dust Considerations for Optimal Workflow
How do you make sure your workshop runs smoothly and safely, especially when you’re dealing with electrical supply and dust? Having direct outlet connections for your power tools is a great place to start. This setup helps prevent circuit overload and also sets you up for any future upgrades to 220/240v systems for those higher-demand tools you might want down the line.
You also need to think about space. Keeping at least 8 feet around your tools creates a safe area for moving around and handling longer boards. If you ever found yourself tripping over cords or bumping into things, you’ll know how critical this is.
Now, let’s talk about dust. A solid dust collection system is key, and it works best when your tools are placed strategically. You want a clean workspace, not just for comfort, but to improve the air quality while you’re working. It’s a must for your health and a big boost for productivity.
Don’t forget to regularly check on your electrical setup and dust collection methods. As you bring in new tools or take on different projects, you might need to tweak things for optimal performance. The best part is that using a downloadable layout tool can help you visualize and plan for the necessary clearances and organization. Choosing a dust collector with an airflow capacity of 550 CFM or higher ensures effective dust extraction for most workshop setups.
Recommended Products

Shop Fox 3 HP Portable Cyclone Dust Collector W1869

Motor: 2 HP, 220V, 3450 RPM, 9A
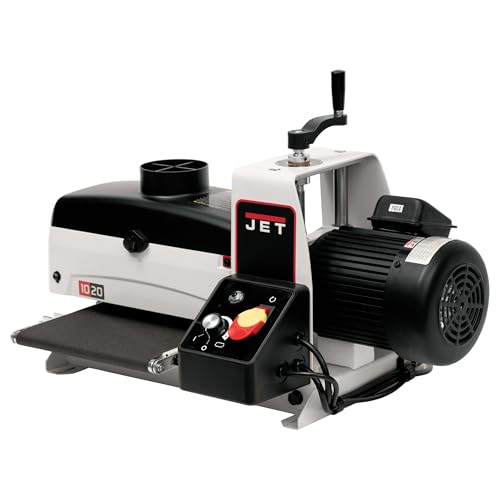
Heavy-duty die-cast aluminum and steel body provides rigidity for consistent quality
Tips for Keeping Your Workshop Organized and Tidy
Have you ever walked into your workshop and felt overwhelmed by the mess? It can be tough to focus on projects when tools are scattered everywhere and supplies are hard to find. Keeping a workshop organized isn’t just about looking good; it’s crucial for both safety and getting things done efficiently.
One way to tackle the chaos is by setting up a labeling system for all your tools and supplies. This simple step helps you identify what you need quickly, so you don’t waste time searching. Also, think about going vertical with your storage. Wall-mounted racks and pegboards can be a real space-saver, keeping your work surfaces clear and open for whatever you’re working on.
Regular cleaning isn’t just a chore—it’s a productivity booster. Scheduling cleaning sessions helps keep the clutter at bay and ensures you’re ready to dive into your next project without distraction. And here’s a practical tip: multi-functional workbenches with built-in storage can be fantastic. They maximize your workspace while keeping everything organized all in one place.
So, why does this matter? Developing a habit of returning tools to their designated spots immediately after use can promote orderliness and make it easier to track your tools. It might feel tedious at first, but trust me, it pays off in the long run. Using customizable compartments in your organizers can further enhance this system by fitting your specific tool sizes and needs. In the end, these straightforward tips can really enhance your workshop’s organization and efficiency.
Are you ready to create a space that inspires productivity? Let’s get organized!
How to Assess and Optimize Your Workshop Layout?
Have you ever felt like your workshop is more of a cluttered mess than a well-oiled machine? Getting your layout right can really make a difference when it comes to productivity and safety. Start by measuring your space; you want to make sure there’s at least 8 feet of clearance for moving those long boards around.
Try using an online layout tool to experiment with different setups. Picture your workflow—what makes sense for how you work? By organizing your workstations and storage in a way that flows, you’ll find you can save time and energy.
Here’s the trick: group similar tools together. For instance, keep your milling tools in one spot and your hand tools in another. This clustering helps cut down on unnecessary trips across the workshop, and we all know extra steps can really slow things down.
Don’t forget to keep reassessing your layout; it’s a living thing that should evolve with new tools or projects. Honestly, adding vertical storage options, like pegboards, can help you keep things organized while ensuring your most-used tools are always at hand. Incorporating workbenches with integrated power outlets can also streamline your workflow by providing convenient access to electricity right where you need it.
Recommended Products

World-Class Beech Workbench: Designed for serious woodworking, carpentry and professional shop use, this workbench features a solid 3 11⁄32" thick European beech wood top that resists warping and delivers stability, precision and reliability
![JEGS 72 in. Rolling Tool Cabinet/Toolbox. 11-Drawer with Upper Storage [Stainless Steel]](https://m.media-amazon.com/images/I/41apv3wzgPL._SL500_.jpg)
Stainless Steel With Rolling Caster Wheels

Modular 3-in-1 Design: Integrates a spacious workbench, side storage cabinets, and a pegboard into a single, space-efficient system. The perfect solution for maximizing functionality in any garage or workshop.
Frequently Asked Questions
How Does Workshop Layout Impact Employee Morale and Productivity?
A well-designed workshop layout boosts our morale and productivity. By enhancing workstation aesthetics, ensuring employee comfort, maximizing space utilization, and promoting collaboration areas, we can cultivate an organizational culture that values workflow efficiency and respects personal space.
What Are Common Mistakes in Workshop Layout Planning?
We often see mistakes like inefficient spacing, poor tool accessibility, cluttered walkways, and inadequate ventilation. Also, lack of signage, excessive noise, inflexible design, and not incorporating employee input can seriously hinder effective equipment placement.
How Often Should I Reassess My Workshop Layout?
We should reassess our workshop layout biannually. For instance, after a redesign, we used employee feedback to identify workflow bottlenecks. Regular space utilization analysis guarantees efficient equipment placement and compliance with safety standards, enhancing productivity.
Can I Incorporate Flexibility Into My Workshop Design?
Yes, we can absolutely incorporate flexibility into our workshop design! Using flexible workstations, modular furniture, and movable equipment will create dynamic environments, while adaptable storage and reconfigurable layouts enhance our collaborative zones and zoning strategies.
How Do I Decide Workstation Size and Arrangement?
We decide workstation size and arrangement by juggling ergonomic considerations and safety regulations, while pretending traffic flow’s secondary. Balancing task-specific layouts, equipment placement, and collaboration zones guarantees future scalability and clever workspace organization’s at play.


